Nginx动态编译介绍
Nginx之前是不支持动态编译的,直到2016年才支持。Nginx在1.9.11版本增加了一个重要的功能:动态模块。
给广大nginx使用者带来了巨大影响。
通过动态模块,我们可以在运行时有选择的添加第三方模块和官方模块。新的实现方式通过API模块保持尽可能的向后兼容。
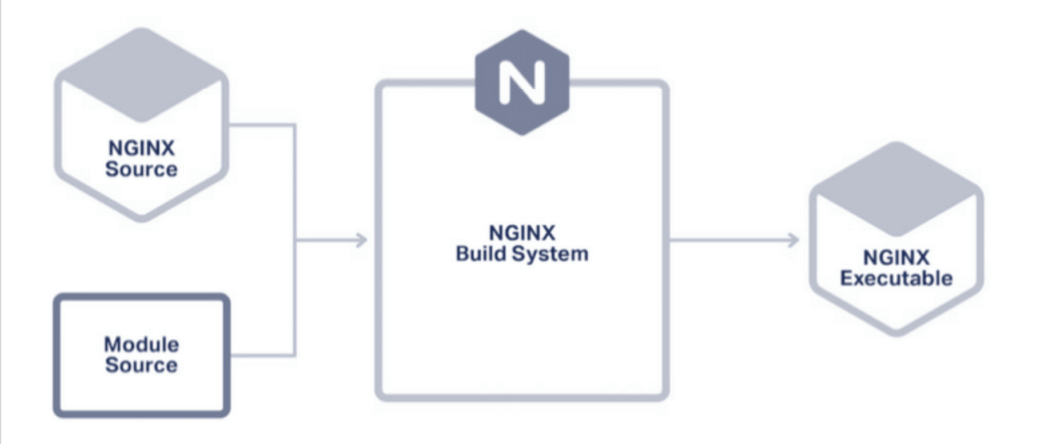
静态模块
在支持动态编译之前,如果要给Nginx添加一个模块,需要将模块与源代码一起编译进Nginx二进制文件。而且不管你是否
愿意,每次打开Nginx都是加载此模块。如此以来就很难在操作系统发行版的包中为每个用户创建自定义的Nginx二进制文件。
如图:
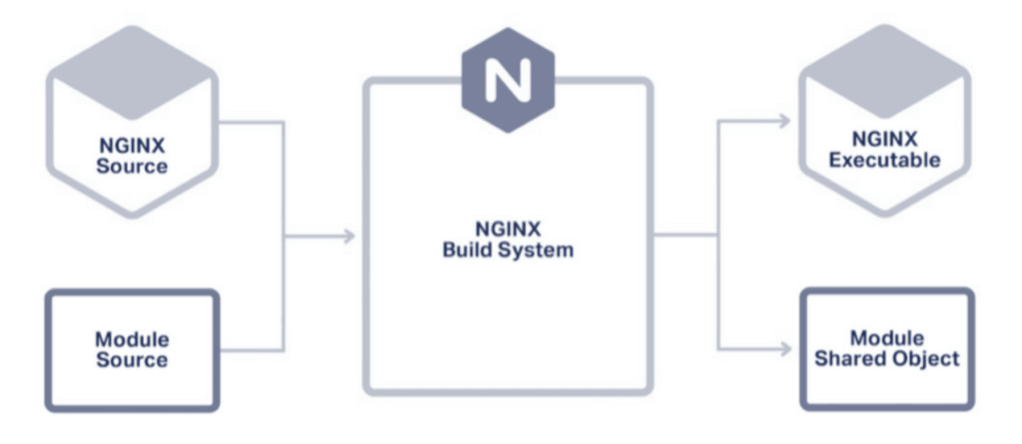
动态模块
动态模块在编译安装时,会创建一个modules的子目录,用来存放动态加载模块共享对象的二进制文件,默认的路径为 xxx/nginx/modules。
要在运行时加载模块,在全局配置中使用load_module命令,指定动态模块共享文件的路径,并以引号括起来。当重新加载配置或重启Nginx的时候,
模块就会被载入。路径可以是相对路径,也可以是完整路径。
load_module “modules/ngx_http_image_filter_module.so”;
如图:
动态编译http_image_filter_module模块
准备工作
首先我们进到nginx目录下,nginx -V查看之前编译时的参数:
➜  nginx ./sbin/nginx -V
nginx version: nginx/1.16.0
built by clang 10.0.1 (clang-1001.0.46.4)
configure arguments: --prefix=/Users/xiepeng/xp/nginx
➜  nginx
可以看到我们之前只是指定了nginx安装目录,并没有做太多的配置。
我们还可以通过./configure --help查看有哪些模块支持动态编译。
➜  nginx-1.16.0 ./configure --help|grep dynamic
  --with-http_xslt_module=dynamic    enable dynamic ngx_http_xslt_module
  --with-http_image_filter_module=dynamic  enable dynamic ngx_http_image_filter_module
  --with-http_geoip_module=dynamic   enable dynamic ngx_http_geoip_module
  --with-http_perl_module=dynamic    enable dynamic ngx_http_perl_module
  --with-mail=dynamic                enable dynamic POP3/IMAP4/SMTP proxy module
  --with-stream=dynamic              enable dynamic TCP/UDP proxy module
  --with-stream_geoip_module=dynamic enable dynamic ngx_stream_geoip_module
  --add-dynamic-module=PATH          enable dynamic external module
  --with-compat                      dynamic modules compatibility
从上面的--with-http_image_filter_module=dynamic我们可以看出:=dynamic说明该模块是支持动态编译的。
开始编译
编译前我们看下objs这个目录:
➜  nginx-1.16.0 ls
CHANGES    LICENSE    README     conf       contrib    man        src
CHANGES.ru Makefile   auto       configure  html       objs       ~
➜  nginx-1.16.0 ll objs
total 1912
-rw-r--r--  1 xiepeng  staff    40K  5 20 00:49 Makefile
-rw-r--r--  1 xiepeng  staff    16K  6 13 19:11 autoconf.err
-rw-r--r--  1 xiepeng  staff   232B  6 13 19:11 autotest.c
-rwxr-xr-x  1 xiepeng  staff   851K  5 20 00:49 nginx
-rw-r--r--  1 xiepeng  staff   5.2K  5 20 00:49 nginx.8
-rw-r--r--  1 xiepeng  staff   1.7K  6 13 19:11 ngx_auto_config.h
-rw-r--r--  1 xiepeng  staff   531B  6 13 19:11 ngx_auto_headers.h
-rw-r--r--  1 xiepeng  staff   5.7K  6 13 19:06 ngx_modules.c
-rw-r--r--  1 xiepeng  staff    19K  5 20 00:49 ngx_modules.o
drwxr-xr-x  9 xiepeng  staff   288B  5 20 00:40 src
首先我们执行./configure生产Makefile文件。如果是官方自带模块,用--with-http_image_filter_module=dynamic即可。
但如果是第三方模块的话。需要用-–add-module=/data/software/ngx_xxx_module这种方式。
此时,一定要记得切记带上之前的参数:
➜  nginx-1.16.0 ./objs/nginx -V
nginx version: nginx/1.16.0
built by clang 10.0.1 (clang-1001.0.46.4)
configure arguments: --prefix=/Users/xiepeng/xp/nginx
➜  nginx-1.16.0 ./configure --prefix=/Users/xiepeng/xp/nginx --with-http_image_filter_module=dynamic
然后执行make命令,用gcc将原始码编译成为可执行的object files 。此时要注意:千万别执行make install,否则就覆盖安装了。
➜ nginx-1.16.0 make
编译完成后再次查看objs这个目录:
➜  nginx-1.16.0 ll objs
total 2144
-rw-r--r--  1 xiepeng  staff    44K  6 13 19:24 Makefile
-rw-r--r--  1 xiepeng  staff    25K  6 13 19:24 autoconf.err
-rwxr-xr-x  1 xiepeng  staff   851K  6 13 19:25 nginx
-rw-r--r--  1 xiepeng  staff   5.2K  6 13 19:25 nginx.8
-rw-r--r--  1 xiepeng  staff   5.4K  6 13 19:24 ngx_auto_config.h
-rw-r--r--  1 xiepeng  staff   531B  6 13 19:24 ngx_auto_headers.h
-rwxr-xr-x  1 xiepeng  staff    24K  6 13 19:43 ngx_http_image_filter_module.so
-rw-r--r--  1 xiepeng  staff   1.2K  6 13 19:42 ngx_http_image_filter_module.c
-rw-r--r--  1 xiepeng  staff    16K  6 13 19:43 ngx_http_image_filter_module.o
-rw-r--r--  1 xiepeng  staff   5.7K  6 13 19:24 ngx_modules.c
-rw-r--r--  1 xiepeng  staff    19K  6 13 19:25 ngx_modules.o
drwxr-xr-x  9 xiepeng  staff   288B  5 20 00:40 src
可以看到在objs这个目录下面增加了ngx_http_image_filter_module.so、ngx_http_image_filter_module.c和ngx_http_image_filter_module.o这三个文件。
通常会在对应的nginx目录下面生成一个modules的目录。
➜  modules pwd
/Users/xiepeng/xp/nginx/modules
➜  nginx ll modules
total 48
-rwxr-xr-x  1 xiepeng  staff    24K  6 13 20:34 ngx_http_image_filter_module.so
加载动态模块
最后,我们只要在nginx.conf配置文件中加载对应模块。然后在重启nginx即可生效。
load_module modules/ngx_http_image_filter_module.so;
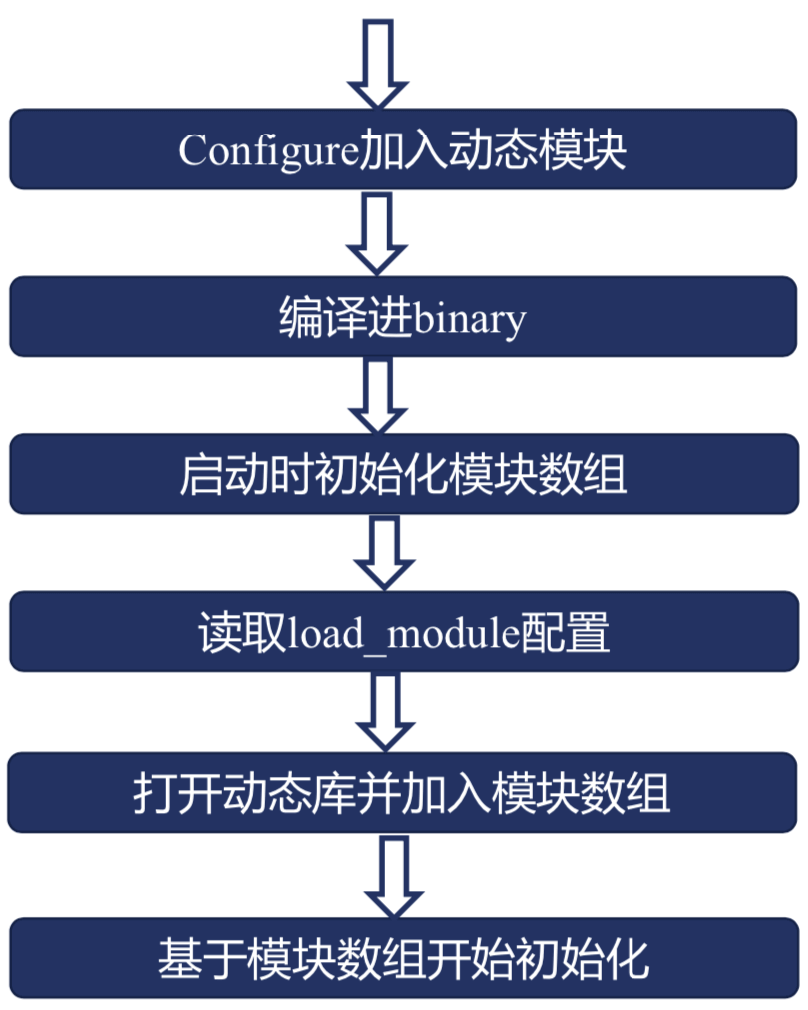
总结
文章末尾,我们用一张图来总结整个动态编译流程。如图: